Learn Webpack
I use Webpack.
I have used it in create-react-app (CRA) through react-scripts, and in other projects that have custom configs set up before I lay a finger on them. But I don’t really know how it works. I look at the configs, I understand some of the ideas behind it, but I’ve never written a Webpack config, or tried to set my own up. That is what this article will be about. Going from no config, to a basic functioning setup that will bundle HTML, CSS, and Javascript.
My goal is to demystify as much of the process as possible, so that Webpack can be more accessible and friendly to newer developers.
If you’re working in React or another library or framework that needs a build process and you want to break your reliance on CRA or just get more comfortable with what magic is going on, we’ll dive right in to creating a project. Since I am writing this in parallel with the project I’ll go step by step and explain along the way how I tackle each problem and research mysteries.
Feel free to follow along or use the github repo I’ve set up. If you choose to follow along, I have specifically used images of certain files so they can’t just be copy pasted. Typing these things out will help get you comfortable with making mistakes, seeing them, and fixing them.
First up, get the project laid out-
mkdir webpack-in-plain-english
cd webpack-in-plain-english
npm init -y
mkdir src
touch src/index.js
mkdir src/components
touch src/components/App.js
npm i react react-dom
Now we need a few dev dependencies to make this all work. For me, this is where things can get confusing because a lot of the functionality of these start to blur together. We need Webpack, and its friends the CLI and** dev server**. To make this work in the browser we need to transpile the** es6** and later parts of our code into** es5** standards. Webpack does not transpile, that’s the job of babel and the loader and preset packages.
npm i -D webpack webpack-cli webpack-dev-server html-webpack-plugin

npm i -D babel-core babel-loader@7 babel-preset-env babel-preset-react
Webpack itself as a package we will not touch directly, it does the work but only through the **webpack-cli **package that we’ve installed so that we can interface and configure Webpack. The Webpack dev server package is a nifty tool that will run our build process, and serve it to a browser. As for the Babel items, they really deserve their own writeup and I’ll likely write a continuation of this to get more into how these work and the different configurations possible.
Everything we have just installed needs some configuration.
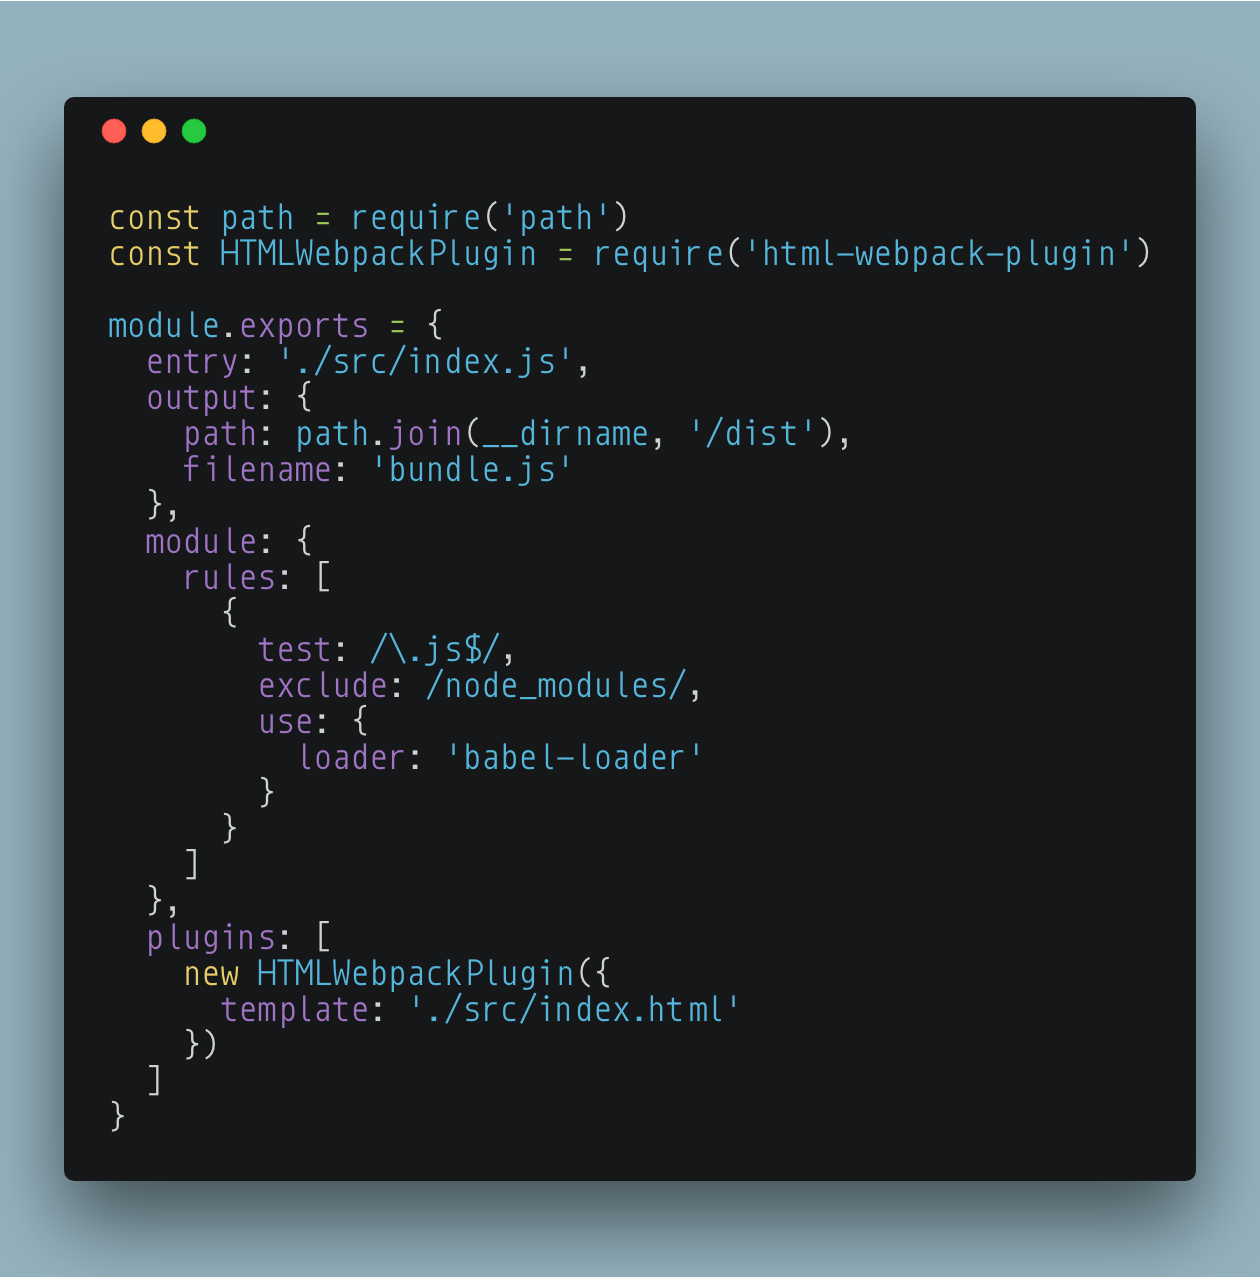 webpack.config.js
Entry is where Webpack starts crawling the files. Essentially it loads in index.js, looks at what it consists of, and if it sees that index.js is importing other files, it deals with those according to the configuration it has.
Output lets us define where we want our bundled js file to go. In this case we will use the node.js ‘path’ module to define our path. The second key in the object is simply the filename.
Module is where we define how to handle each file that Webpack encounters. The ‘rules’ array contains objects that define filetypes and how to handle them. For each rule you specify what the extension should look like, any folders or files to exclude, and what to use when preparing these files. In this instance we are telling Webpack that it needs to look for .js file extensions, exclude any that are in the **node_modules **folder, and use babel-preset as its loader.
Config is done, for now. We need to add some scripts to our package.json so we have actually make use of this config and the power of Webpack.
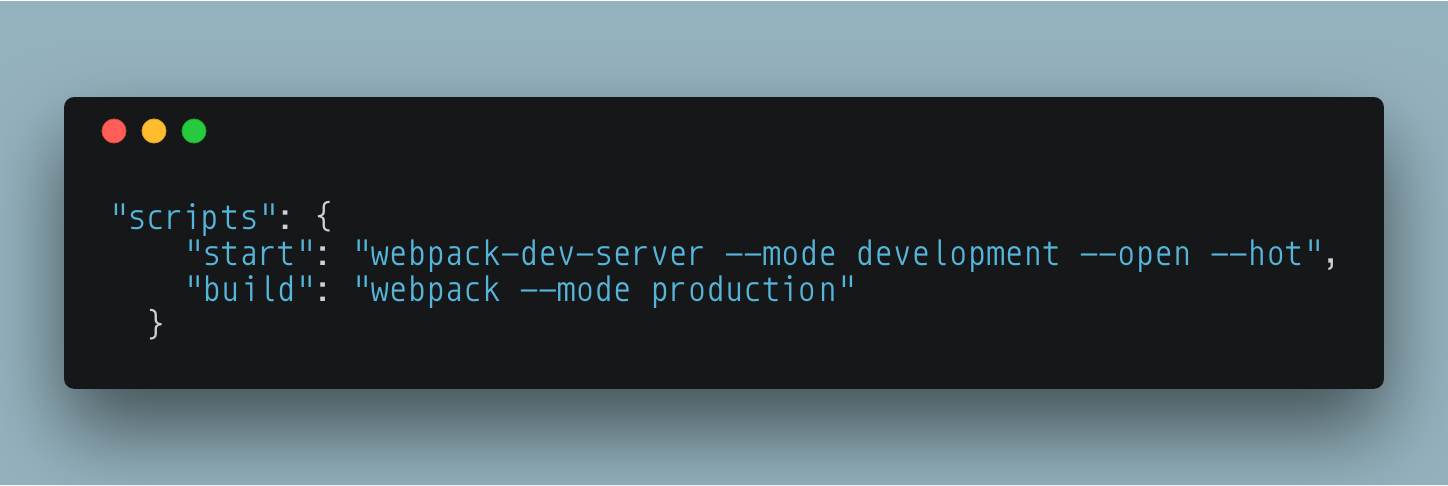 package.json
Our start script will run the Webpack dev server, which serves a build of our project, but doesn’t write it to disk, it does this in memory. We have also specified that we are in development mode, we want a browser to be opened when we run this command, and that we want Webpack to watch our files and ‘hot’ reload them when there are changes.
Note: For those unaware, **hot reload **refers to the ability for the code to automatically recompile and reload the page in the browser whenever a change is made.
The build command will write the project to disk and because we are using the production flag it will be optimized for end user consumption.
Since we defined our js loader as ‘babel-loader’ we need to give it a configuration of it’s own. Using presets makes it this simple to tell babel how to deal with the Javascript:
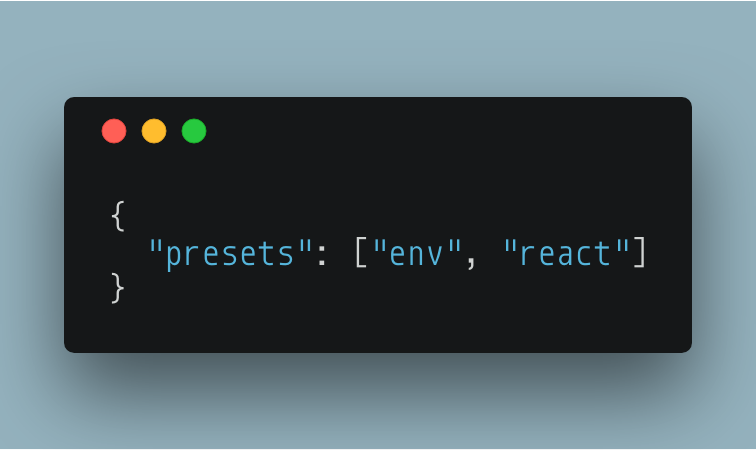 .babelrc
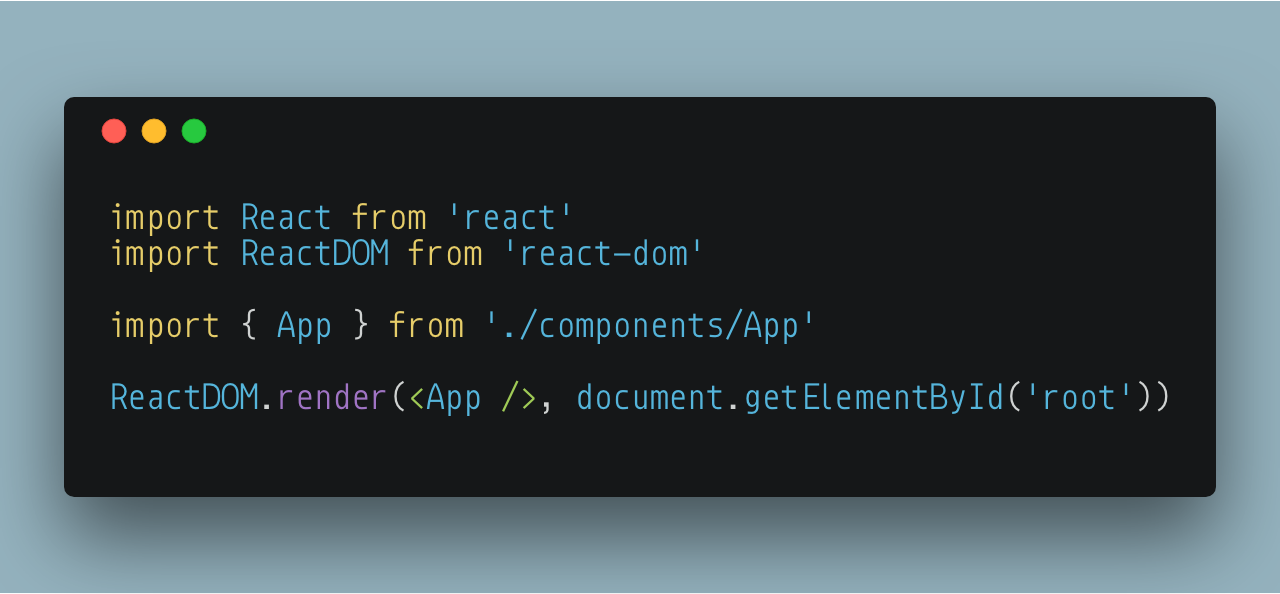
Since this is about webpack, and not actually about building an app, the index.js and App.js files respectively should look like this:
index.js
import React from 'react'

import ReactDOM from 'react-dom'

import { App } from './components/App'

ReactDOM.render(<App />, document.getElementById('root'))
App.js
import React, { Component } from 'react'

export class App extends Component {

 render() {

  return <p>Hi, I've been packed, and transpiled</p>

 }

}
it was brought to my attention by Maryna Cherniavska that I omitted the index.html file. Here it is, thank Maryna.
<!DOCTYPE html>
<html lang="en">
 <head>
  <meta charset="UTF-8">
  <meta name="viewport" content="width=device-width, initial-  scale=1.0">
  <meta http-equiv="X-UA-Compatible" content="ie=edge">     <title>Webpack React</title>
</head>
<body>
  <div id="root"></div>
</body>
</html>
Simple enough to see whether or not our scripts and configs are working. At this point if you run npm start you should have a browser pop open in short order and show you the results of what Webpack has put together with this config. Let’s look at how Webpack has dealt with index.js (the entry we defined).
 index.js webpack entry
The first line is importing React, that’s in node_modules and falls under our exclusion and Webpack knows not to do anything with that import, same with the second line. Upon the import of App, Webpack will go ahead and crawl through that file as well. Adding it’s contents to the bundle, and progressively through the app until all code is accounted for in the bundle.
What we have now is a working basic Webpack configuration. But wait, this doesn’t include styles. Go ahead and make a styles.css in the components folder and import your modifications to the ‘p’ tag into App.js like this:
import './styles.css'
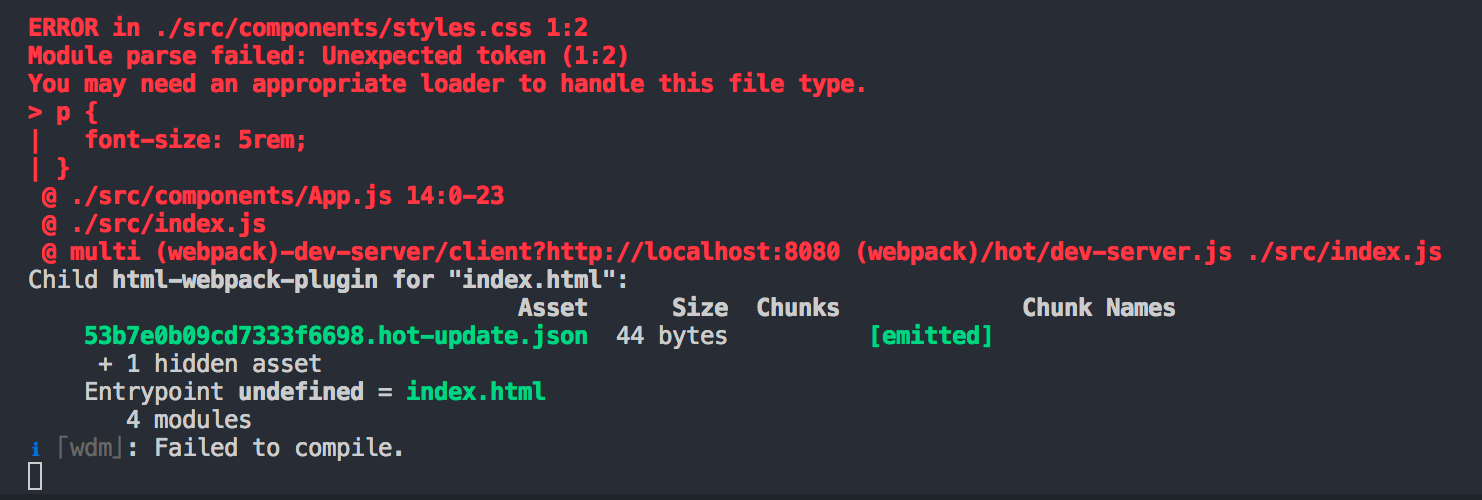
Alright, now it’s broken. Great. All this setup and I can only display un-styled garbage!
This brings us to the most important part of Webpack usage. Researching loaders and finding how to resolve problems. This problem is an easy one to solve because it’s one that a lot of people have dealt with. A simple google search will guide you to an npm package called ‘css-loader’ or ‘style-loader’. You’ll see that you have to install them through npm and then modify your Webpack config with another test to include css files and tell it how to deal with them. These loaders let us set another rule, this time for css. This is not going to output a css file with your styles, but add them into your Javascript like this:
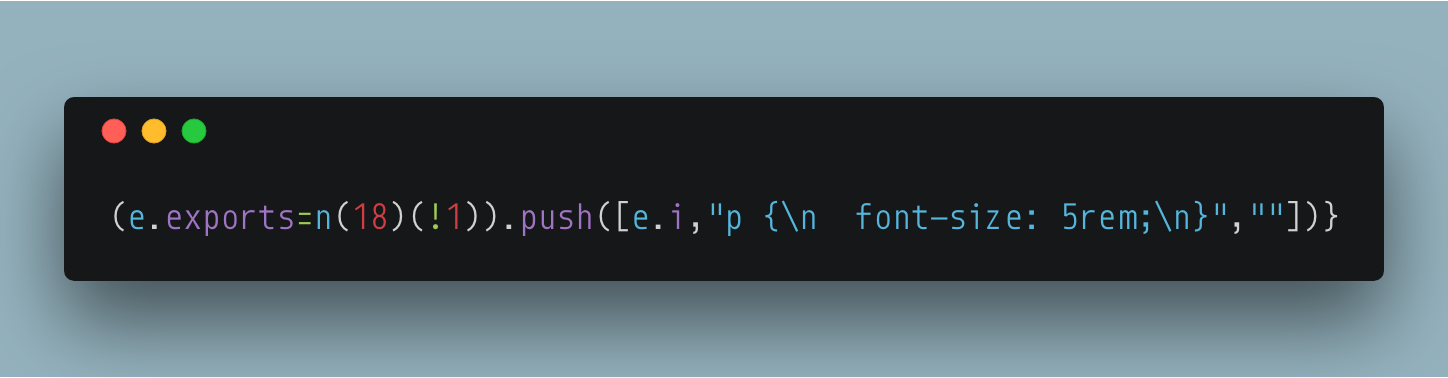 Inline styles in webpack output
With a quick npm i style-loader css-loader and then adding a rule to the Webpack config that looks like this:
{

test: /\.css$/,

use: ['style-loader', 'css-loader']

}
You now have the ability to import styles into your React components and make something not only functional, but pretty as well. 😁
So now we have a couple things working and a foundation of how to configure Webpack, some ideas on Babel (which is its own beast to tame), and how to add loaders for increased functionality.
This is the beginning of a beautiful relationship. Build processes can be daunting, but if you have a solid foundation and know how to expand upon that you can get along just fine.
If you have additional resources or see a problem with this guide feel free to drop me a line in the comments. I’m also on twitter @GrantGlidewell.